Documentation (Help File)
- Item Name: Adri | Business, Consulting, Finance – WordPress Theme
- Documentation Version: v1.0
- Author: AjdeThemes
- Support: Contact AjdeThemes
Getting Started #back to top
What’s Included #back to top
When you purchase our theme from Themeforest. You can download theme files from Themeforest > Your Account > Downloads.
Navigate through your purchased items. Click download button then you will se 2 options. Main file contain everything. Installable WordPress Theme is included only installable WordPress theme file. Check list of what’s included when you download the main file option.
- Installable Theme File (.zip) – You can upload this file to your WordPress to install the theme.
- Documentation – Contain theme documentation file.
- Licensing Folder – Contain all licensing info files.
- Changelog (.txt) – Included all theme versions changelog info
Requirements For Theme #back to top
To use theme. You must be running WordPress 5.0 or higher, PHP7.2 or higher and MySQL 5.6 or higher. Below are checklists you should ensure your web host can comply with.
- Please make sure that your web host has the minimum requirements for WordPress.
- Always update to the latest version of WordPress.
- You can also download the latest version of WordPress from here.
- Always created secured WordPress, FTP and database accounts.
Recommended PHP Configuration Limits
Many issues which may occurs when you are using some features of theme for example demo import, menu settings. are related to low PHP configuration limits on your webhost. The solution is to increase settings. You can change it by contacting your webhost and ask them to increase the limits. Here are recommended PHP configuration limits.
- max_execution_time 180
- memory_limit 128M
- post_max_size 32M
- upload_max_filesize 64M
What’s my current PHP limits
You can use this plugin to check current PHP limits or you can contact your web host and ask them for the information.
Installation #back to top
Upon downloading the item, you will have an Installable Theme File (.zip) inside the main downloaded folder.
Follow this steps to install the theme:
- Go to your WordPress Dashboard and navigate to Appearance > Themes.
- Click Add new and hit upload button.
- Select Theme Installable Theme File (.zip) file from the main download folder and click “Install Now” button. Once finished uploading theme file. Go to Appearance > Themes and activate it.
- Then you will be prompted to install the required plugins.
- Install & Activate the required plugins.
- Next Install the demo data.
NOTE: WP-SCSS if any error messages show at the top of the screen, after updating the WP-SCSS plugin, navigate from Dashboard > Settings > WP-SCSS > click Save, this will fix any (possible) errors shown by this plugin.
Recommended version of WP-SCSSS is v2.1.6, if there is a problem in a newer version simply roll back to the version 2.1.6. You can do this from the Wordpress.org page of the WP-SCSS plugin > Advanced View > Previous versions > download v2.1.6 > then manually upload and replace the version active in your installation.
Common WordPress Installation Error: stylesheets missing?
Most common mistake is that you've uploaded the whole main (downloaded) folder, instead of the actual theme that is inside the main folder. In very rare cases the download might be corrupted, so try downloading it again.
Required Plugins
- Elementor Page Builder – Add theme page builder main functionality.
- Adri Ajdethemes Elements - Add theme’s custom widgets to Elementor page builder.
- Contact Form 7 - Required for creating custom contact and registration forms.
- WP-SCSS - Allows the WordPress Customizer to update colors and some settings.
- One Click Demo Import - Add demo import functionality.
- Slider Revolution - Add hero slider functionality.
Recommended Plugins (optional)
- Envato Market – Add auto theme update functionality.
- WooCommerce - Required for shop pages functionality.
- Max Mega Menu - Add mega menu dropdown functionality.
Required & Recommended Plugins Installation
Here are steps to install required plugins
- Log into your WordPress Admin area.
- You will see notice message about required plugins. Click on “Begin installing plugins” or you can go to Appearance > Install Plugins.
- Select plugins you want to install for example “Elementor Page Builder” then install and activate selected plugins.
Additional Plugins We use on demo site
- EWWW Image Optimizer – help optimise image quality and file size.
- Imsanity – helps optimise maximum uploaded images size.
- W3 Total Cache – Add caching to your WordPress for better loading speed.
- Autoptimize – Add caching & compression to CSS & JS files
Need Help? Contact Support
How to update the theme #back to top
First, make sure you backup the WordPress Customizer settings by using this plugin.
Update using Envato Market Plugin (recommended)
- You need to download (.zip) the plugin from here.
- Go to ThemeForest > You Account > Settings > API Key and copy API Key.
- Click the ‘Envato Market’ menu in WordPress Dashboard.
- Enter your API Key and you will be able to see your purchased items which is included Adri theme.
Update using plugin
- Download the theme from ThemeForest > Download > Adri ..., you can chose to download only the installable files (the theme) or all files. If you download all files inside the main folder is located the theme zip file. Make sure to NOT upload the main folder with all files, just the theme zip file.
- You need to download and install Easy Theme and Plugin Update.
- After installing the plugin. Go to Apperance > Themes > Add New > Upload Theme
- Select “adri-....zip” file and choose “Upgrade existing theme” option to “Yes” and click “Install Now” button
Update it manually via FTP
- Download the theme from ThemeForest > Download > Adri ..., you can chose to download only the installable files (the theme) or all files. If you download all files inside the main folder is located the theme zip file. Make sure to NOT upload the main folder with all files, just the theme zip file.
- Login to your FTP account. Navigate to wp-content>themes location, backup the theme
by simply saving it to your computer. - Unzip the theme files, and darg and drop them on the server in wp-content>theme.
Click Replace when prompted.
Common issues when updating
- Are You sure you want to do this? If you get this message. Please check with your web host upload file size limit and ask them to increase the limitation.
- Theme install failed destination folder already exists. This is because WordPress allows you to have only 1 theme with the same name and folder. To get around this issue, please update theme using auto updater or FTP steps above.
Theme Support #back to top
All of our themes come with free support and currently we handle all support questions through the item's comment section.
In order to help speed up solution for your requests. Please follow steps below before submitting a new question. This is for the benefit of everyone in order to help find the solution for your question quickly.
- Make sure you are running the latest version of Theme and the latest version of WordPress.
- Check out theme documentation and discussion forum for the answer to your question.
- Disable any additional 3rd party plugins you are using to check if it fixes the issue.
- If you can find the answer submit your question via the comment section.
Support Includes:
- Responding to questions or problems regarding the item and its features.
- Fixing bugs and reported issues.
- Providing updates to ensure compatibility with new software versions.
Support does NOT include:
- Customization and installation services.
- Support for third party software and plug-ins.
Common issues when updating
Missing stylesheet error? Most common issue that happens with new users installing WordPress theme. Make sure you are NOT uploading the whole main folder that you've download and instead browse inside the main folder to located the theme zip file. In very rare cases the download zip file might get corrupted, so try downloading it again.
Demos #back to top
Import Demo Site #back to top
When you first install the theme, you won't get all the pages and settings you see in the demos. You chose to import the demo content that you want.
When importing a demo via the demo importer, many processes are happening simultaneously in the background. This is a resource intensive task and will take some time (is not uncommon to take up to 15min or more).
Recommended PHP Configuration Limits
Many issues may occur when importing demo, most of them are related to low PHP configuration limits on your web host. The solution is to increase the settings. Here are the recommended PHP configuration limits:
- max_execution_time 180
- memory_limit 128M
- post_max_size 32M
- upload_max_filesize 64M
Demo Content
NOTE: Importing the "Main Demo (Impact)" will import also all the other (non home) pages. Importing other demos will import only the home page and it's corresponding styles.
If you want to import demo other than main demo and to import quickly all the pages, after you are done importing your demo, you can manually import the pages (see manual import bellow).
IMPORTANT: Demo importer can vary in time. The included required plugins need to be installed and activated before you import demo. Please check the System Status to ensure your server meets all requirements for a successful import. Settings that need attention will be listed in red.
Steps to import the demo content:
1. Install and activate all required plugins before you proceed. This includes recommended plugins - for example if the demo has store you need WooCommerce plugin activated.
2. Prepare the Elementor plugin for importing the demo data - Dashboard > Elementor > Settings > check "Disable Default Colors", check "Disable Default Fonts".
3. Navigate Dashboard > Appearance > Import Demo Data, chose the demo that you want and click import (only once) and wait - it can take up to 15min and more.
4. (optional) If you want to use the mega menus, Max Mega Menu plugin should be installed & active. Then enable the plugin by going - Dashboard > Appearance > Menus > Max Menu Settings > check Enable > Save.
5. After you visit the website, it might have different color. The Customizer settings should be imported but the colors might not be applied, yet. - Just open the Customizer click on random settings and then cancel, don't publish, close the Customizer and do hard browser refresh Ctrl/Cmd + Shift + R. The colors should be applied now.
6. (optional) In case the Slider Revolution slider is not installed via the demo import - import it manually from the main folder > exports > sliders > name of the slider . zip, then Dashboard > Slider Revoultion > Manual Import > drop the slider zip file.
7. (optional) If you use the Portfolio elements - Make this change to Elementor: Open any page with Elementor Page Builder > Top left hamburger menu (3 horizontal lines) > Site Settings > Lightbox > disable Image Lightbox.
That's it enjoy your demo!
IMPORTANT: You can import one demo per WP installation, with the One Click Demo Importer.
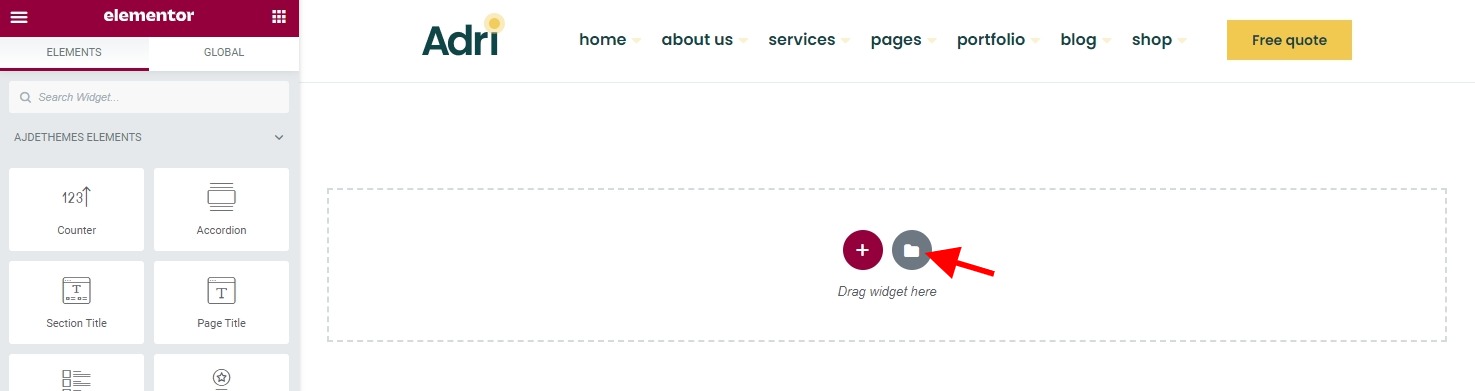
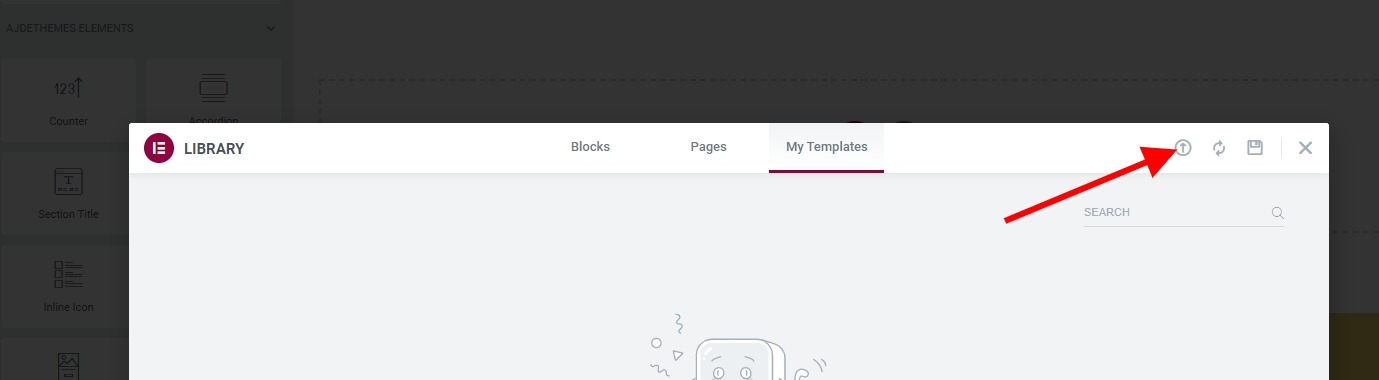
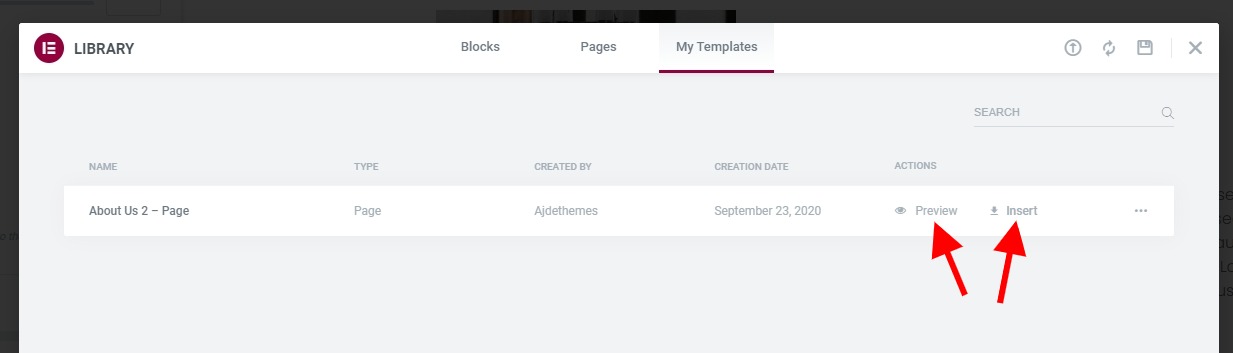
Import Single Demo Page #back to top
You can import a single page as Elementor Template. All the page templates are located in the main download folder exports.zip > elementor.zip > Elementor > elementor-... .json file.
To import a template, create new page, edit it with Elementor, click the templates icon, then import a the template that you want and click insert.
Import Demo Issue #back to top
Importing demo content is complicated process that downloads media files from demo server to your server.
There might happen some limited setting on your server to kill the importing process when it reach certain level of server resource usage. This is usually related to your server limitation.
In this cases workaround is to manually import the content with different plugins and import the media manually later.
In case of issue with the import contact the support - via our profile page contact form and share your WordPress admin login credentials.
Header #back to top
Setting up Menus #back to top
Menu Locations
The theme comes with 3 menu location:

Create your menus and assign them to this correct locations. Importing the demo data will also import the menus used in the demo.
Adding your logo
Navigate Customize > Site Identity > Site Logo upload your logo.
If you have the transparent navigation option selected, here will be shown Transparent Nav Site Logo - option to show different logo when the navigation is transparent.
Navigation Settings
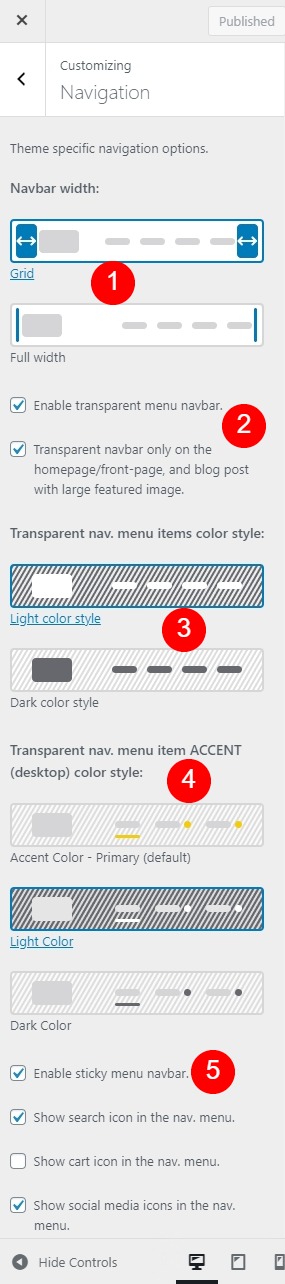

Numbers on the image left, correspond to the numbers in the explanation list.
1. Make the navigation menu full width or be in a grid with the rest of the content on the page.
2. Transparent navigation settings - see the this section for more info.
3. Transparent navigation settings - see the this section for more info.
4. Transparent navigation accent color - you can set it as your primary color, light or dark color, depending on the background bellow the transparent navigation.
Note: add primary color from the Colors section in the Customizer.
5. Makes the navigation menu stick - be always shown as you scroll down the page.
Show search icon in the menu, at the far right.
Show cart icon in the menu, at the far right - only if you have WooCommerce activated.
Show social media icons at the bottom of the mobile navigation.
5.1. Show and hide social media icons in the nav menu (mobile). To add the icons use the Social Icons section outside of Navigation. Use this shortcode to display the icons - replace with your own content :
[slinks]
[sicon sc_link="#" sc_icon="fab fa-linkedin-in"]
[sicon sc_link="#" sc_icon="fab fa-twitter"]
[sicon sc_link="#" sc_icon="fab fa-tiktok"]
[sicon sc_link="#" sc_icon="fab fa-youtube"]
[/slinks]
6. Change the background color style of the navigation (desktop only) when is not transparent, you can chose between light or dark color.
Note: you can add your own colors from Colors section in the Customizer.
7. Change the background of the dropdown menu - with contrasting menu items.
8. Default (non-transparent) navigation accent color - you can chose the primary color, light or dark color.
Note: add primary color from the Colors section in the Customizer.
What about my own custom/brand colors?
The main idea of this theme is to be controlled via two color settings: primary and secondary color. You can adjust those in the Customize > Colors - that will have effect over the whole theme including the navigation.
Transparent Navigation #back to top
When the navigation does not have a background and lays on top of a hero or slider or other elements is called transparent navigation.
Enable Transparent Navigation
Click Customize > Navigation > check "Enable transparent menu navbar."
Transparent Navigation Settings
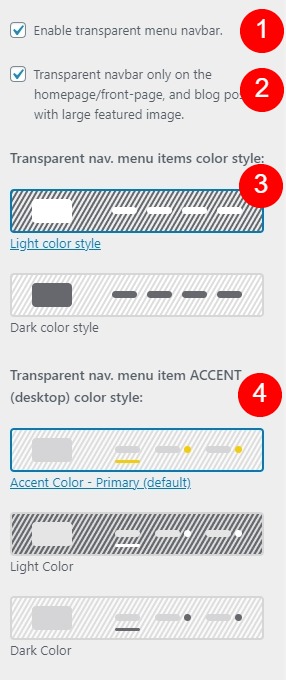
Numbers on the image left, correspond to the numbers in the explanation list.
1. Enable/Disable the transparent navigation - this will make the navbar "see trough" and it will lay on top of the first element usually slider image, adjust the nav. settings so the navigation be visible or contrasting to the background image.
2. Make the transparent navigation show only on the home page, for example when you have hero/slider there, for the other pages the navigation menu will have the standard styling.
3. Option to change the color of the menu items - this will depend on your background, if the background is dark (most cases) - select "Light color style" for the menu items. In cases where the background is white/light select the "Dark color style" for the menu items. This setting only affects the navigation when is transparent.
4. Transparent nav. menu items accent color - the underline color bellow the menu item or arrow color next to the menu item if it has dropdown.
Note: add primary color from the Colors section in the Customizer.
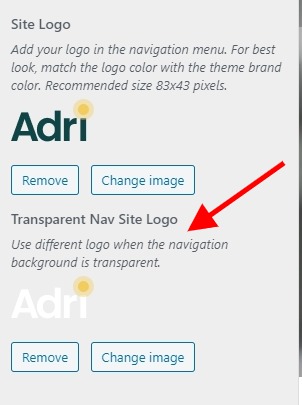
When you enable transparent navigation menu, option to add different logo for the transparent navigation will become available in Customize > Site Identity > Transparent Nav Site Logo. Shown in on the image left (with the arrow).
Mega Menu #back to top

Mega Menu is larger dropdown menu that you can add more content inside, instead of just menu item.
Enable the Mega Menu
1. You need to have Max Mega Menu plugin installed and activated.
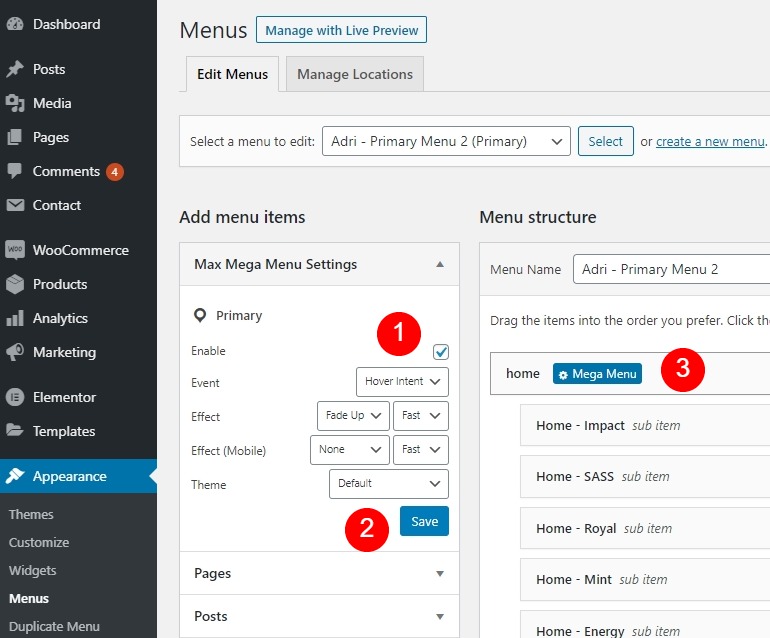
Numbers on the image left, correspond to the numbers in the explanation list.
When the plugin is enabled, you will have the settings from the image left in Appearance > Menus.
1. Check to enable/disable the mega menu.
2. Click Save after you checked "Enable" or change other settings.
3. Now when you hover over a menu item, a badge with Mega Menu will appear. Clicking it will open the mega menu creator window. You want to create mega menus only at the top most menu item not nested items.
NOTE: The theme styling can be controlled via the Customize > Colors and Customize > Navigation. Don't use the Mega Menu plugin own theme settings.
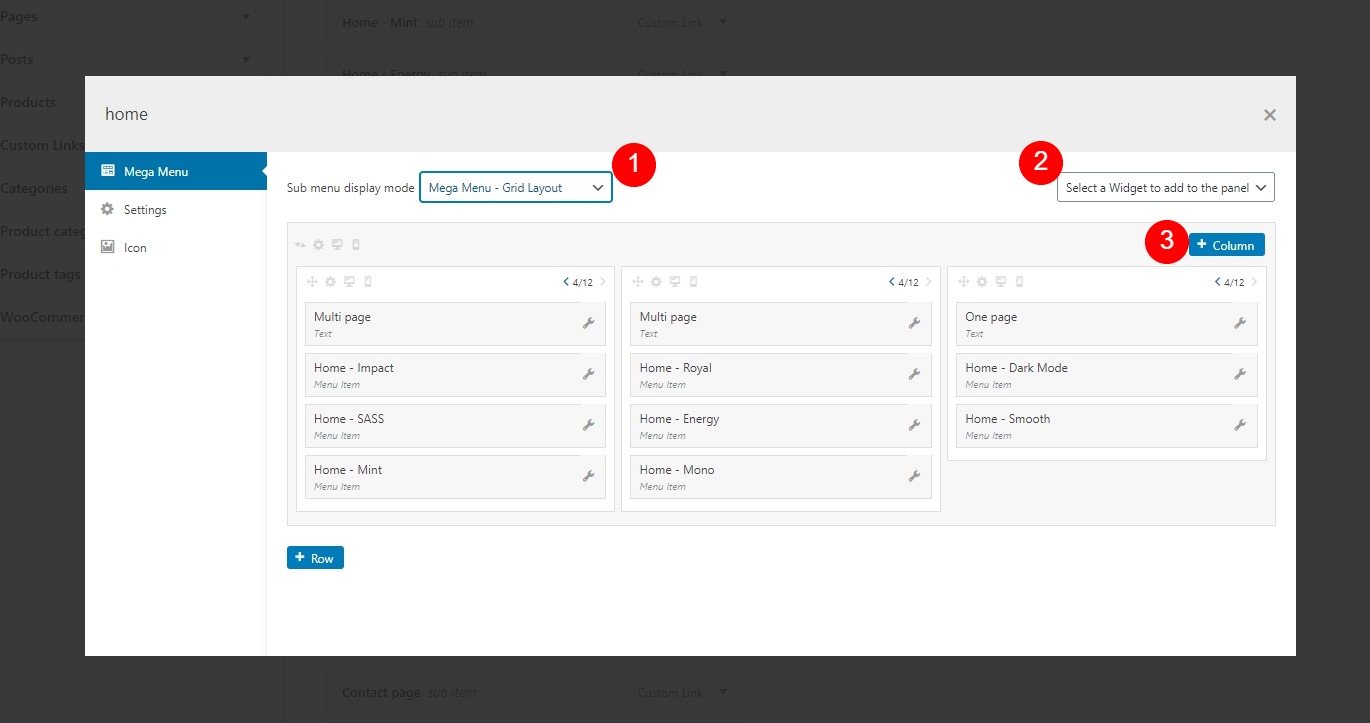
Numbers on the image above, correspond to the numbers in the explanation list.
1. Select Grid layout to be able to put your content in grids - in most cases this is the setting you need for a mega menu.
2. You add additional content via widgets, selecting and clicking a widget will appear on in the grid bellow.
3. Add columns, when a column is added click on the arrows to increase/decrease its size.
Mega Menu - Widgets
The Text widget uses only as title can be used in a column as a group title.
The theme comes with the custom widget Adri Feature Inline Icon - you can add this to display your services more stylishly in the mega menu.
Header/Hero - Sliders #back to top
All the hero/header - sliders are created with Slider Revolution plugin, except in the "Mono" demo, see the this section for more info. "Mono" demo slider is created via the Elementor widget - Thirds Slider.
Pages #back to top
Content
Create a New Page
1. Go to Dashboard > Pages > Add New and enter title.
2. When using Elementor to create your pages always set the Page Attribute > Template > Elementor Full Width.
NOTE: To use the Elementor when creating pages always set Page Attribute > Template > Elementor Full Width.
Add Page Title
When using Elementor there is a custom widget Page Title that enables you to create a page title.
You can also create page title via Customize > Page Title, for blog pages that are not created by Elementor.
Elementor Page Builder #back to top
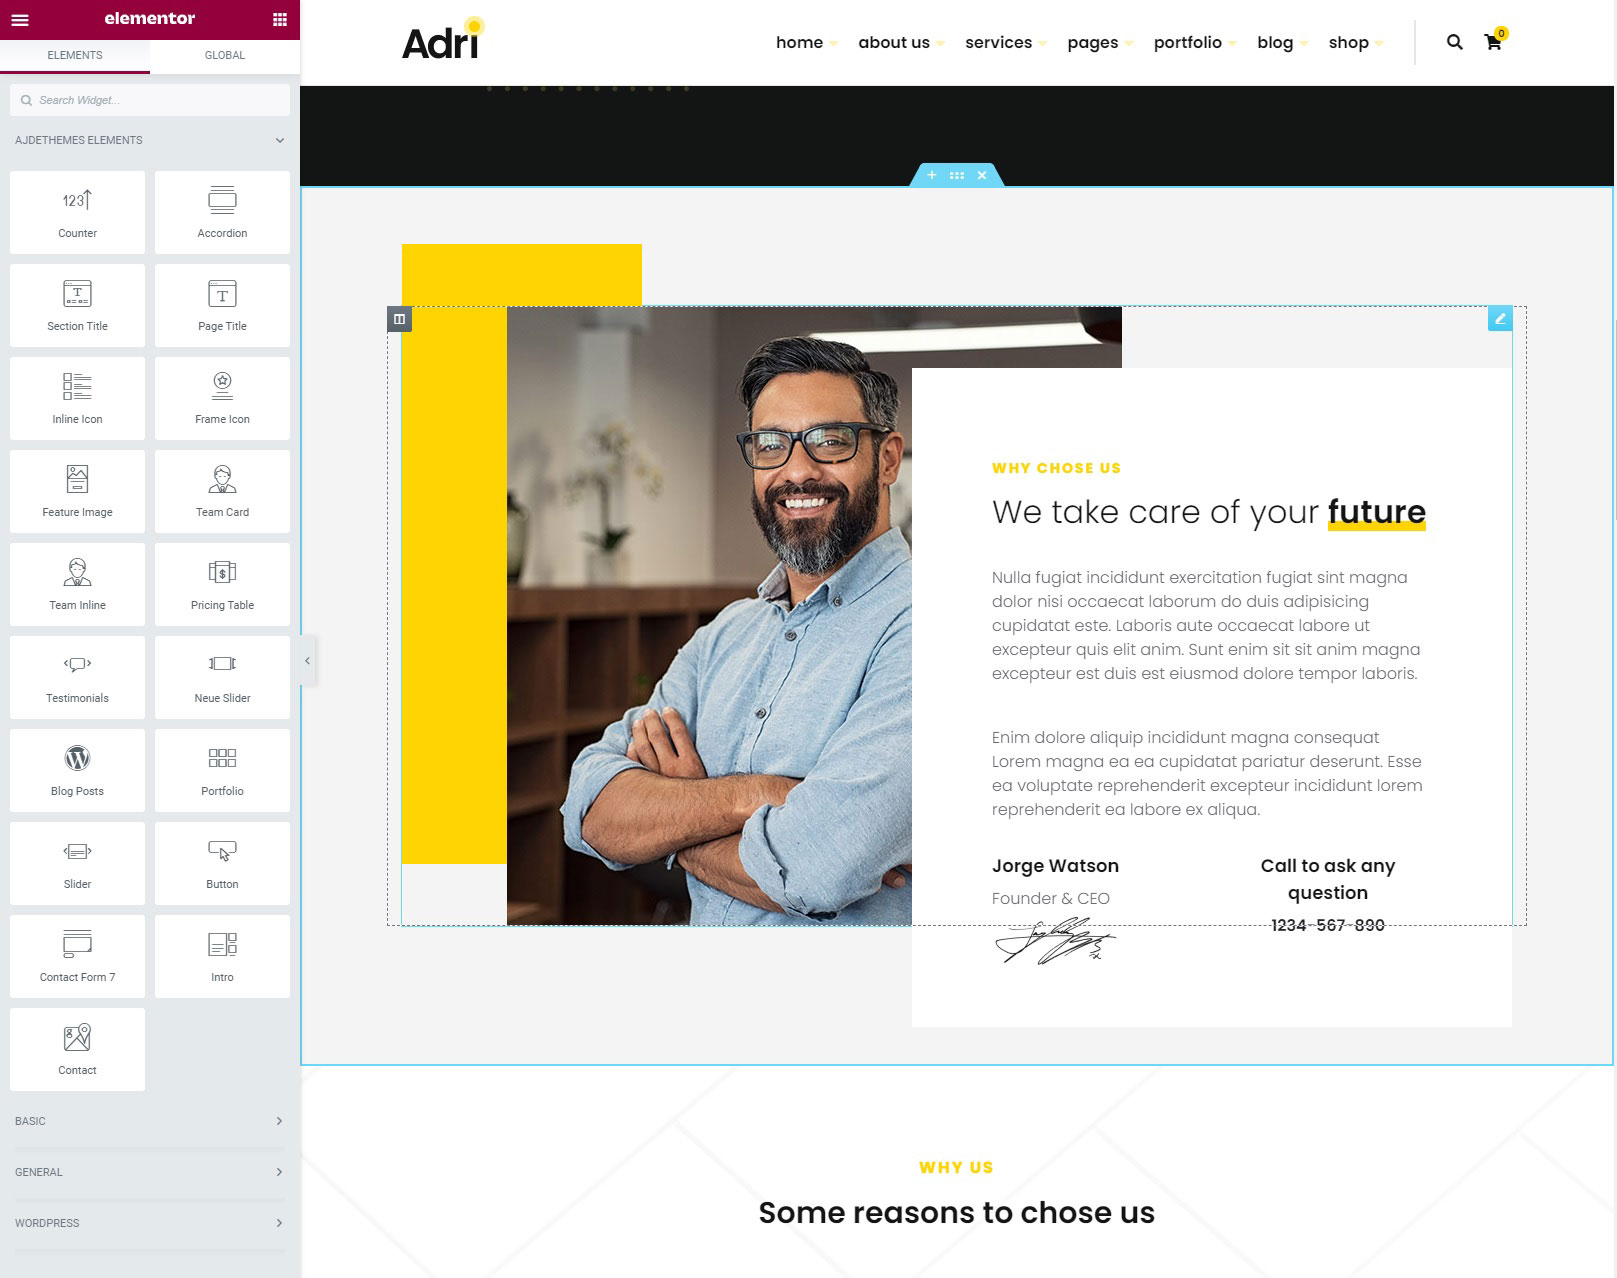
We are using Elementor Page Builder plugin so you can use its drag&drop user interface to create your page contents.
Install & activate the plugin - Adri Ajdethemes Elements to enable all custom Elementor widgets.
*NOTE: When you first install the theme you need to setup few Elementor settings.
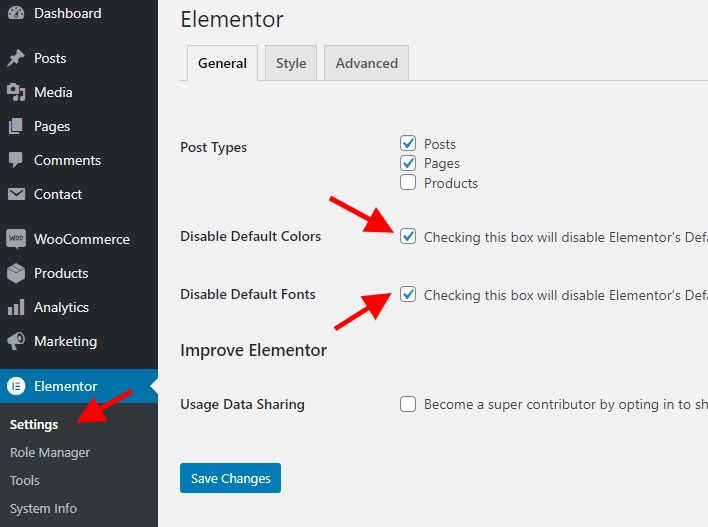
Navigate Dashboard > Settings > check "Disable Default Color, check "Disable Default Fonts", click Save Changes.
Open a page, at the top click Edit with Elementor > top left menu icon (3 horizontal lines) > Site Settings > Lightbox > un-check Image Lightbox. Click update at the bottom.
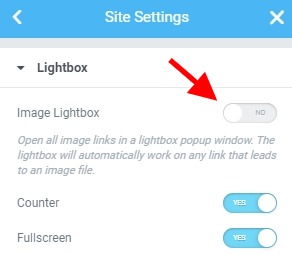
Open a page, at the top click Edit with Elementor > top left menu icon (3 horizontal lines) > Site Settings > Lightbox > un-check Image Lightbox. Click update at the bottom.
NOTE: To use the Elementor when creating pages always set Page Attribute > Template > Elementor Full Width.
NOTE: You don't need to buy the PRO version or activate anything to use this plugin with the theme. All the demos are created with the free version of Elementor. If you like the plugin and you want to support the developer or you like some extra PRO features you should get the PRO versions.
Setting up Homepage #back to top
By default when you activate the theme, your latest blog post will be shown as a home page. You can change this setting from Dashboard > Settings > Reading > Your home page displays - select a static page, and chose pages for home and blog.
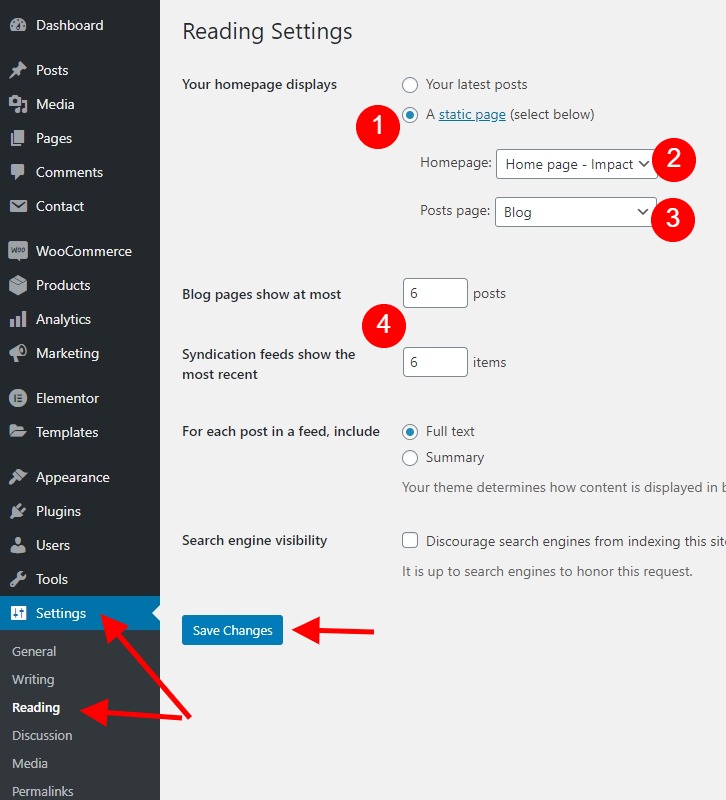
Numbers on the image left, correspond to the numbers in the explanation list.
1. Chose where you want static page to be as a home page - or you want your latest blog posts.
2. Select a page to be home page - make sure the page is created first.
3. Select a page for the blog posts - simply create empty page with title Blog.
4. Chose the number of blog posts to be displayed per blog page.
Click Save Changes.
Setting up One Page Site #back to top
One page site - is a site that has all the content on one page, except the blog (if it has one). Here the navigation will scroll down to a section on the page instead of going to another page.
The Page Setup
First add to each page section, ID's and the class op-section, that you want to navigate from the menu.
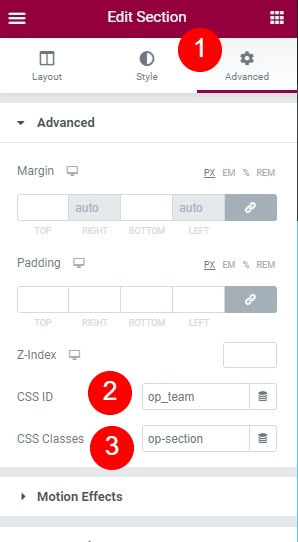
Numbers on the image left, correspond to the numbers in the explanation list.
1. Select a section in Elementor > click Advanced, here you can add ID's and Classes.
2. Add unique ID to that section, prefix the id with something like your company initials etc. Don't create super simple ID's like contact, this may causes conflicts with some other plugins.
3. Add the class op-section, this will allow the menu item be highted when you scroll pass.
Do this for each section that you have on the page.
The Menu Setup
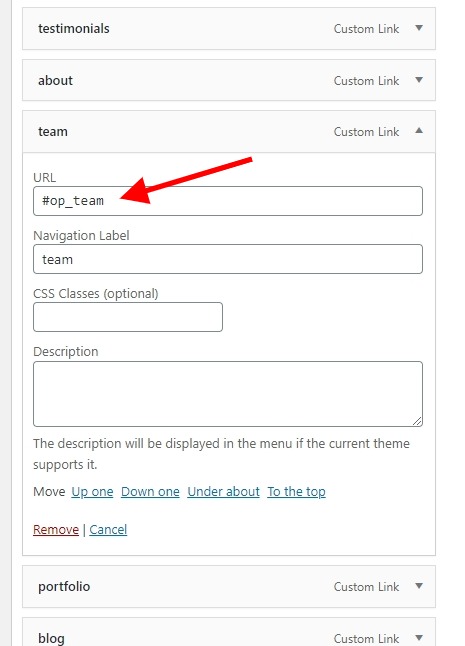
Next, create the menu from custom links, for the url enter the ID from the page section - the URL must start with #, example: #op_team.
So to recap, the URL in the menu matches the page section ID, when you click the menu item you scroll to that page section.
*NOTE: In order the home - menu item to be highlighted (active) add the class current_page_item to the menu item. You can enable adding classes from Dashboard > Appearance > Menus > Screen Options (top right) > check CSS Classes.
Setting up Shop #back to top
The theme is fully compatible with WooCommerce. To enable E-Commerce functionality you need to have the WooCommerce plugin installed and activated.
After that, simply use the WooCommerce startup wizard to install the plugin. Then add your products and start selling.
Installing WooCommerce will add new settings in the Customizer panel related to the product pages.
*NOTE: When importing some of the demos you might import the shop related pages.
Here is a link to more detailed guides how to use WooCommerce.
Blog #back to top
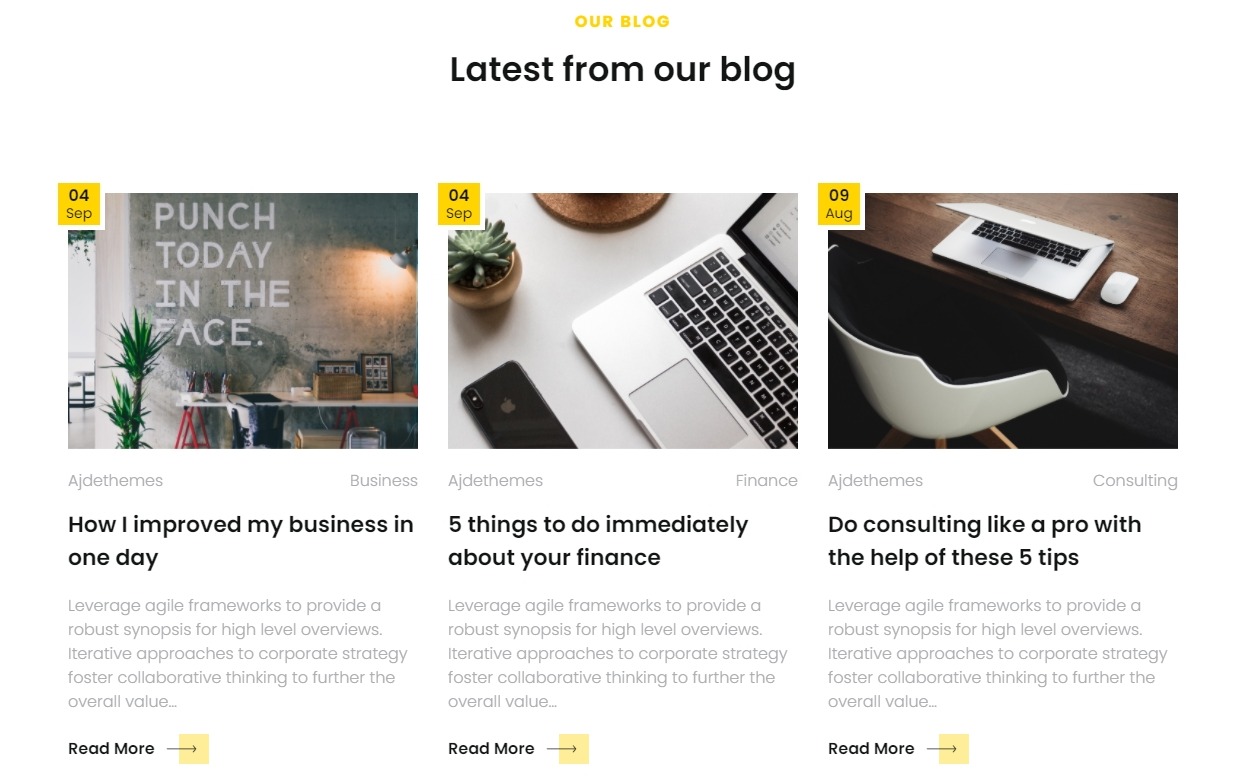
Blog Layouts
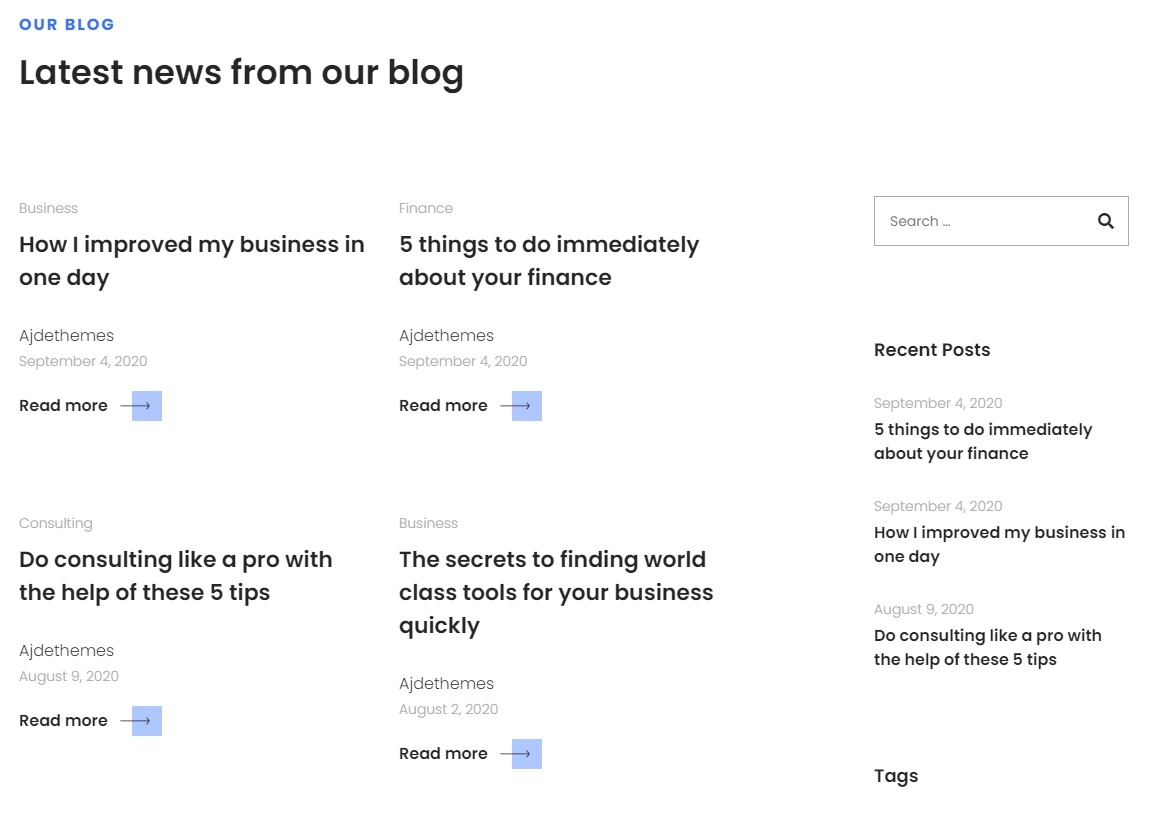
To create a blog post navigate Dashboard > Posts > Add New then write your blog post. All blog settings in the customizer are pretty self explanatory. There are 3 blog layouts to chose from - see images bellow.
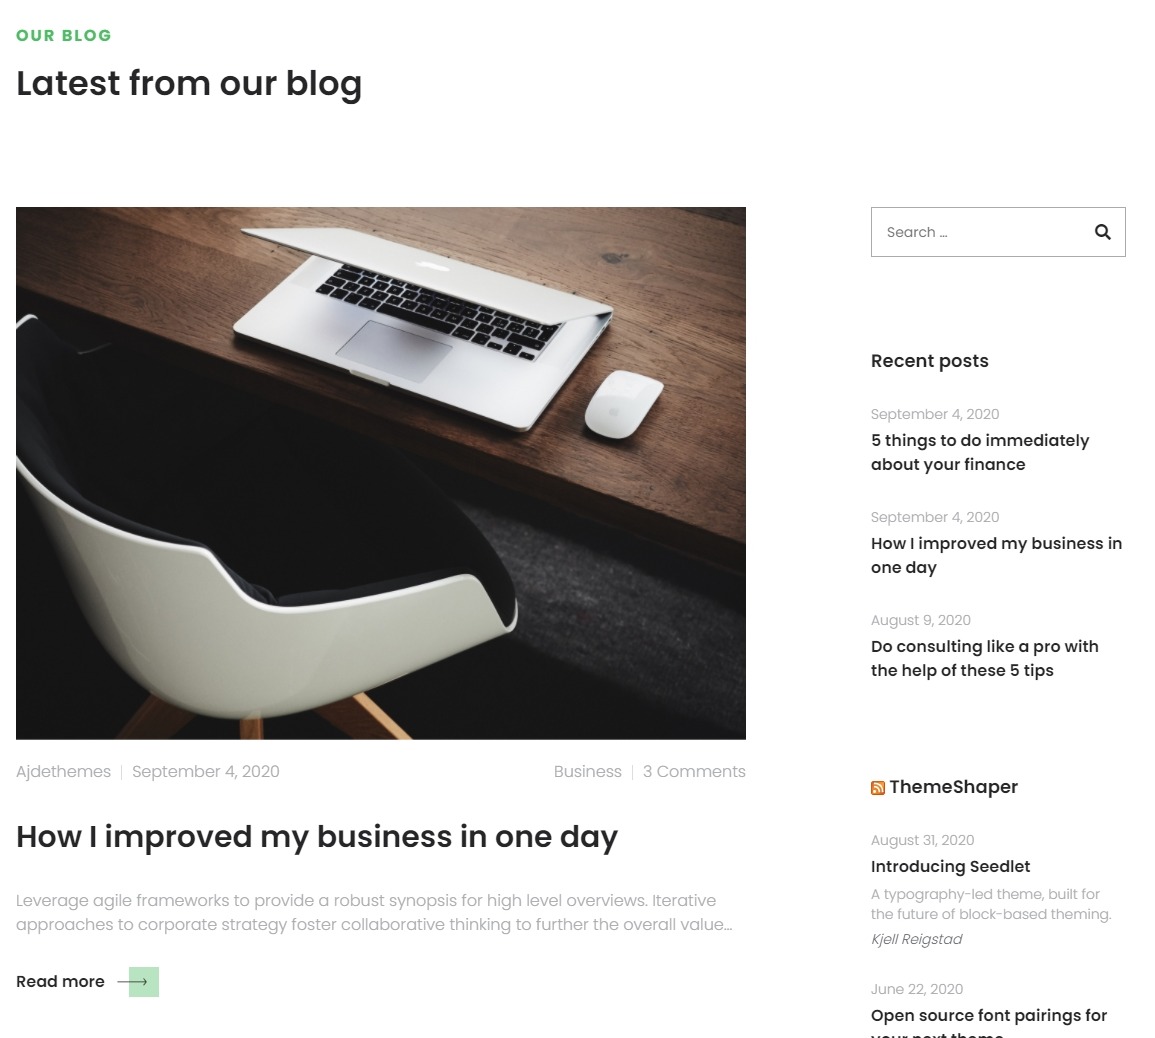
Blog Sidebar Widgets
You can have a sidebar with widgets, sidebar can be placed: left, right or bottom. Or can be hidden. To control the widgets sidebar position navigate: Customize > Blog > Sidebar positions.
You can add widgets to the sidebar from Dashboard > Appearance > Widgets, widget location will be shown on the right side of the page. For the blog sidebar - left or right you need to darg and drop widgets in the Blog Sidebar location. For the bottom sidebar you need to add widgets in the Blog Sidebar Bottom location.
Footer #back to top
All main footer content is added via widgets from Dashboard > Appearance > Widgets > Footer Widgets.
To display a social icons in the footer you can do that via the Text Widget and shortcode from the social icons:
[slinks]
[sicon sc_link="#" sc_icon="fab fa-linkedin-in"]
[sicon sc_link="#" sc_icon="fab fa-twitter"]
[sicon sc_link="#" sc_icon="fab fa-tiktok"]
[sicon sc_link="#" sc_icon="fab fa-youtube"]
[/slinks]
Replace with your own link/url and brand icon.
Footer Settings
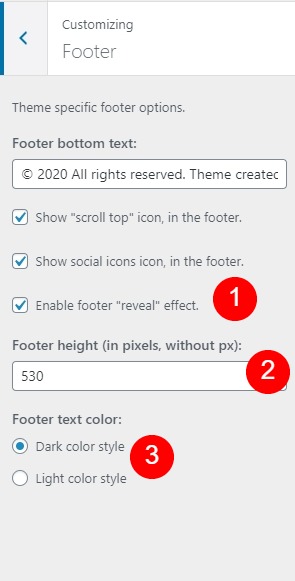
Numbers on the image left, correspond to the numbers in the explanation list.
1. This will enable/disable the Footer "Reveal" effect, used on most demos.
2. Footer height will be only shown if footer reveal is checked. This allows you to set custom footer height based on your footer content.
3. Some color values might make the footer text unreadable you can select the footer text to have light or dark color.
Slider Revolution #back to top
First, make sure you have the Slider Revolution plugin installed & activated.
This will also add Elementor widget called Slider Revolution 6.
The corresponding demo slider or hero/header should be imported when you use the demo importer. If you want to manually import another slider from another demo, you can find all sliders inside the main download folder > exports.zip > SliderRevoultion.zip > SliderRevoultion > slider-name.zip.
Next navigate Dashboard > Slider Revolution > Manual Import here darg & drop the slider zip file.
Here is a link to more detailed Slider Revolution guides.
NOTE: Ignore any activation notices form the plugin, this is a paid plugin but you get it bundled with the theme for free. When you install the plugin, he is fully functional and you don't need to activate anything (except if you want to get more slider templates form SR or some extra animations, or simply support the plugin developer).
NOTE: You can't update this plugin yourself, only when the theme is updated there will be plugin update - if available at the time of the theme update.
Translations #back to top
The theme is fully translatable. You can translate the theme (or other plugins) in your language by using the free WordPress plugin Loco Translate. The plugin generates a PO file from the POT file then compiles it to MO file on the fly as soon as you start to translate the theme or plugin. Loco Translate plugin does not provide language switcher - for this you need more advanced plugin like WPML which is paid plugin and not provided by the theme.
When you translate the theme with Loco Translate plugin, you can switch the language by going to Dashboard > Settings > General change site language to your language and click Save Changes.
The theme is also, fully compatible with the WPML plugin and it has custom locations for it's language switcher.
Setup WPML plugin
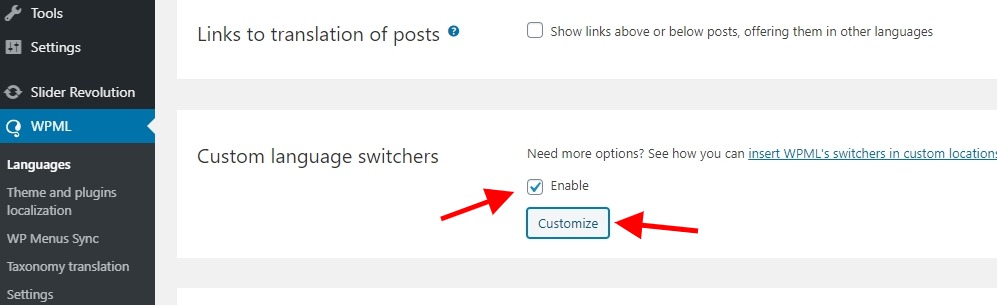
1. First, install & activate the plugin, then go trough the plugin setup and add your languages.
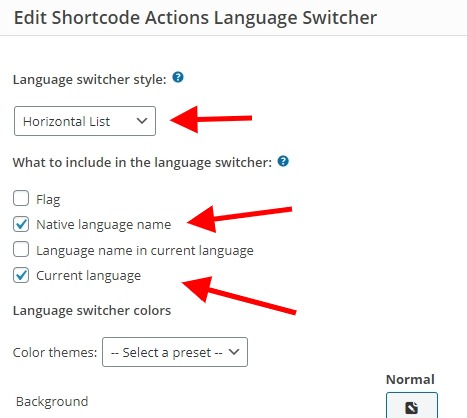
2. From Dashboard > WPML > Languages > Custom language switchers - check > check Enable > Customizer > Select "Horizontal List"; un-check Flag; check "Native language name"; un-check "Language name in current language"; check "Current languages" > Save.
That's it, now the language switcher will show in the Secondary Right Menu and in the mobile navigation at the bottom.
Here is a detailed guide how to use the WPML plugin .
Extras #back to top
Typography (Fonts) #back to top
You can change the theme font via the Customizer > Typopgrahy panel. You can select from few prepicked fonts or you can manually enter the link of the font.
Example: use Google Font, pick a font, then select its weight - sidebar will be opened where under "Use on the web" you will see the link with its markup - we need just the link, not the markup, so copy only the link from inside the href="", and paste it in the Customizer > Typography > Manually link to any font - filed.
Then in the next field "Manually enter the font name" enter the font name without any quotes, and that's it, click publish and do hard browser refresh (Chrome: Shift + Ctrl/Cmd + R).
Manually entering a font will overwrite the pre-priced font.
The author recommends using the font Poppins with this theme.
If no changes are showing after you clicked Publish, exited the Customizer, and hard-refresh the browser, the WP-SCSS plugin might not work correctly. Version 2.1.6 of the WP-SCSS plugin is tested and works so you should roll back to that version - you can download an older version of the plugin from the plugins page on WordPress.org > clicking on "Advanced View" > scrolling down and selecting from "Previous versions", then simply manually upload that zip file and overwrite the new version.
Child Theme #back to top
A child theme is a theme that inherits the functionality and styling of another theme, called the parent theme. Child themes are the recommended way of modifying an existing theme.
Why use a Child Theme?
The reasons to use a child theme is when you modify a theme directly and it is updated, then your modifications may be lost. By using a child theme you will ensure that your modifications are preserved. It's like a layer on top of the parent theme just for your own modifications.
*NOTE: You have includes child theme in the main download folder.
Optimize Your Site Speed #back to top
Image Optimise Plugin
Adding images to your content sometime causes site to load slowly. Here is EWWW Image Optimizer it helps optimise and compress your images files size without loosing quality.
*NOTE: If you already have image uploaded and install EWWW Image Optimizer. Please run Regenerate Thumbnails plugin so your previous uploaded images are optimized.
Caching Plugin
You can use 3rd party plugin to add caching to your WordPress site. It helps speed up response time to your visitors. Here are 2 plugins we recommend.
- W3 Total Cache – Recommend for advanced user with many more options.
- WP Super Cache – Easy to setup caching plugin. Recommend for normal user.
Leverage Browser Caching
Setting an expiry date or a maximum age for static resources ex. images to instructs the browser to load previously downloaded resources from local disk rather than over the network. To do this simply add cache-control headers to origin server by adding the following code to server .htaccess file.
  <filesMatch ".(ico|pdf|flv|jpg|svg|jpeg|png|gif|js|css|swf)$">
  Header set Cache-Control "max-age=84600, public"
Enable Compression
You can enable compression by adding the following to server .htaccess file.
  # Compress HTML, CSS, JavaScript, Text, XML and fonts
  AddOutputFilterByType DEFLATE application/javascript
  AddOutputFilterByType DEFLATE application/rss+xml
  AddOutputFilterByType DEFLATE application/vnd.ms-fontobject
  AddOutputFilterByType DEFLATE application/x-font
  AddOutputFilterByType DEFLATE application/x-font-opentype
  AddOutputFilterByType DEFLATE application/x-font-otf
  AddOutputFilterByType DEFLATE application/x-font-truetype
  AddOutputFilterByType DEFLATE application/x-font-ttf
  AddOutputFilterByType DEFLATE application/x-javascript
  AddOutputFilterByType DEFLATE application/xhtml+xml
  AddOutputFilterByType DEFLATE application/xml
  AddOutputFilterByType DEFLATE font/opentype
  AddOutputFilterByType DEFLATE font/otf
  AddOutputFilterByType DEFLATE font/ttf
  AddOutputFilterByType DEFLATE image/svg+xml
  AddOutputFilterByType DEFLATE image/x-icon
  AddOutputFilterByType DEFLATE text/css
  AddOutputFilterByType DEFLATE text/html
  AddOutputFilterByType DEFLATE text/javascript
  AddOutputFilterByType DEFLATE text/plain
  AddOutputFilterByType DEFLATE text/xml

  # Remove browser bugs (only needed for really old browsers)
  BrowserMatch ^Mozilla/4 gzip-only-text/html
  BrowserMatch ^Mozilla/4\.0[678] no-gzip
  BrowserMatch \bMSIE !no-gzip !gzip-only-text/html
  Header append Vary User-Agent
Changelog #back to top
- Initial release.